In Webflow, the default file upload limit is set to 10MB for single-file uploads and 30MB for background videos. Now, let's be real. Sometimes it's just not enough. What to do then? Follow our step-by-step tutorial and you will definitely succeed.
Step 1: Prepare Your Video
First things first, you need to make sure your video is ready for the web. This means compressing it to reduce the file size while keeping the quality good.
- Optimize your video: Use video editing software or online tools to compress the video. Find a good balance between quality and file size for faster loading times.
- Convert to the right format: Save your video in a format that modern browsers support, like MP4, WebM, or OGG.
Step 2: Upload Your Video to Webflow
Now it’s time to upload your video to Webflow.
- Log in to your Webflow account and open your project.
- Go to the page where you want to add the video.
- Click on the "Assets" tab in the left sidebar.
- Click the "Upload" button and select your optimized video file from your computer. Wait for the upload to finish.
Step 3: Add a Video Element
Next, let’s add the video element to your page.
- Drag and drop the Video element onto your canvas where you want the video to appear.
- Click on the element to select it.
Step 4: Configure the Video Element
Now it’s time to set up your video.
- Click on your video element to open the settings panel on the right.
- Under "Video Settings," click the "Choose Video" button.
- Select the video file you uploaded earlier from the asset manager.
Step 5: Adjust Settings
It's time to customize how your video will play.
- Configure options like autoplay, loop, and mute according to what you want.
- Set fallback images or text for browsers that don’t support video.
Step 6: Publish Your Site
You’re almost done! Now you can preview your site to see how everything looks. When you’re happy with it, hit publish to make your changes live.
Step 7: Test and Optimize
Finally, it’s time to test your video on different devices and browsers. Make sure it loads correctly and doesn’t slow down your site. If the video makes your site load slowly, consider optimizing it further or using a video hosting service like YouTube or Vimeo.
Ok this was an easy part. But what to do when your video is bigger than 30MB?
Use CDN (Google Cloud, Azure, AWS)
At Digi2, we use Google Cloud Platform on a daily basis. Yes we also have Azure and AWS projects but GCP is our choice. Mostly because of the integration between Google Analytics 4 and BigQuery and other Google tools.
So how to add large videos (bigger than 30MB) to Webflow projects?
Step 1: Prepare Your Video
Just like before, ensure your video is optimized for web delivery by compressing it.
Step 2: Log Into Google Cloud Platform (GCP)
Sign in to your Google Cloud Platform account. This platform offers plenty of storage and seamless streaming options.
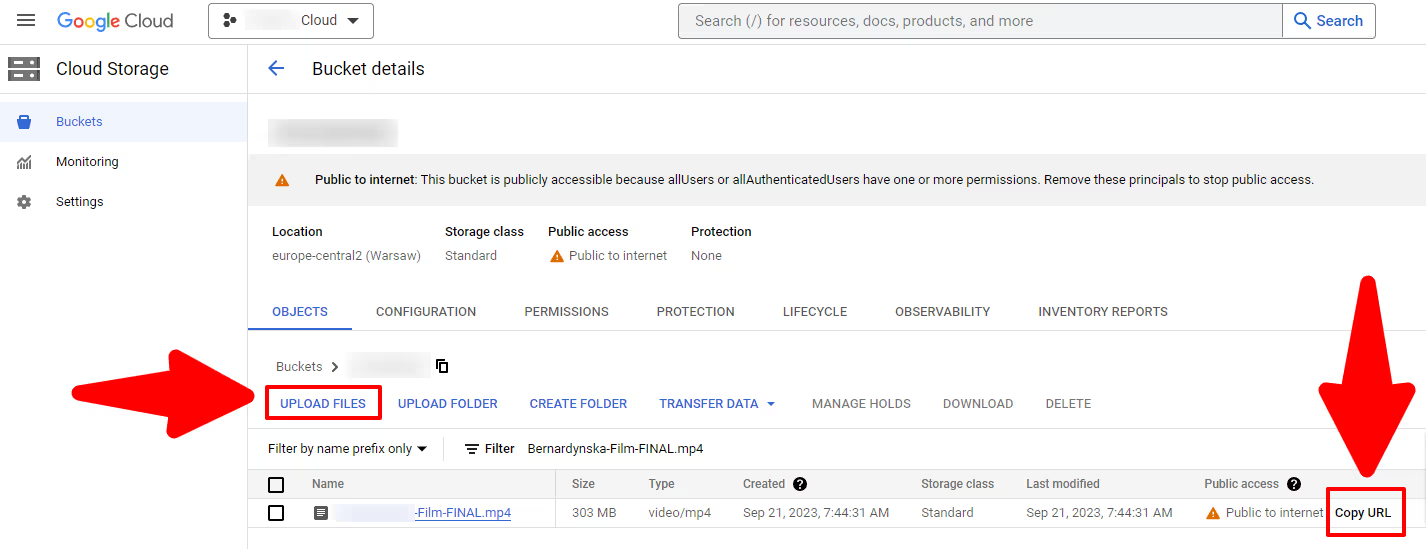
Step 3: Go Into Cloud Storage
Navigate to the Cloud Storage section of your GCP account. This is where you’ll upload your video.

Step 4: Upload Your Video
Upload your video to the cloud storage.

Step 5: Copy Video URL Address
After the upload is complete, copy the URL of your video. This link is what you’ll use to connect your video to Webflow.
Step 6: Return to Your Webflow Project
Go back to Webflow to add the video to your site.
Step 7: Add an Embed Element
Drag an Embed element onto your page. This will allow you to add external content.
Step 8: Paste the Code
In the Embed element, paste the following code:
<video autoplay muted loop width="100%" height="100%">
  <source src="{!!! PASTE_YOUR_VIDEO_URL_HERE !!!}" type="video/mp4">
</video>
Step 9: Replace Video URL
Replace {!!! PASTE_YOUR_VIDEO_URL_HERE !!!} with the URL you copied from Google Cloud.
Step 10: Publish Your Site
Click the publish button to make your video live on your site.


